

SEO Title: How to Download and Install Minecraft (2026): Full Step-by-Step Guide for PC, Mac, Android, iOS & Console Meta Description: Learn how to download and install Minecraft safely on Windows, macOS, Linux, Android, iOS and consoles. Full 2026 guide covering system requirements, the official launcher, Java vs Bedrock, mods, servers and troubleshooting. Slug: how-to-download-and-install-minecraft Focus Keyword: how to download and install Minecraft Secondary Keywords: Minecraft download PC, Minecraft launcher install, Minecraft Java Edition download, Minecraft Bedrock Edition, Minecraft system requirements, Minecraft server hosting, Minecraft mods install, buy Minecraft, Minecraft installation error

1. Introduction: Why the Minecraft Installation Process Still Confuses Millions of Players
Minecraft remains one of the best-selling video games in history, and more than a decade after its original release, millions of new players search every single month for a clear, honest answer to a deceptively simple question: how do you actually download and install Minecraft the right way? The confusion is understandable. Unlike a typical single-purchase game that lives on one storefront, Minecraft exists in multiple editions, across at least six major platforms, with two different codebases, several launchers, and a purchasing system that changed significantly when Microsoft finished integrating Mojang accounts into the Microsoft ecosystem. Add to that a crowded search landscape full of unofficial “free download” pages, sketchy mirror sites, and outdated tutorials that reference launchers that no longer exist, and it becomes clear why so many players end up frustrated before they place their first block. This guide is designed to solve that problem permanently. Over the following sections you will find a complete, platform-by-platform walkthrough of the entire process: choosing the correct edition for your hardware, verifying that your gaming PC or laptop meets the technical requirements, creating and securing a Microsoft account, completing the purchase safely, downloading the official launcher, installing the game, launching it for the first time, optimizing performance, adding mods and shaders, connecting to multiplayer servers, and troubleshooting the errors that most commonly appear during installation. Every step here points to official, legitimate sources, because a pirated or “cracked” copy of Minecraft is not only a violation of the end-user license agreement but also one of the most common vectors for malware, cryptominers, and credential-stealing software targeting gamers.
2. Understanding the Difference Between Minecraft Java Edition and Minecraft Bedrock Edition
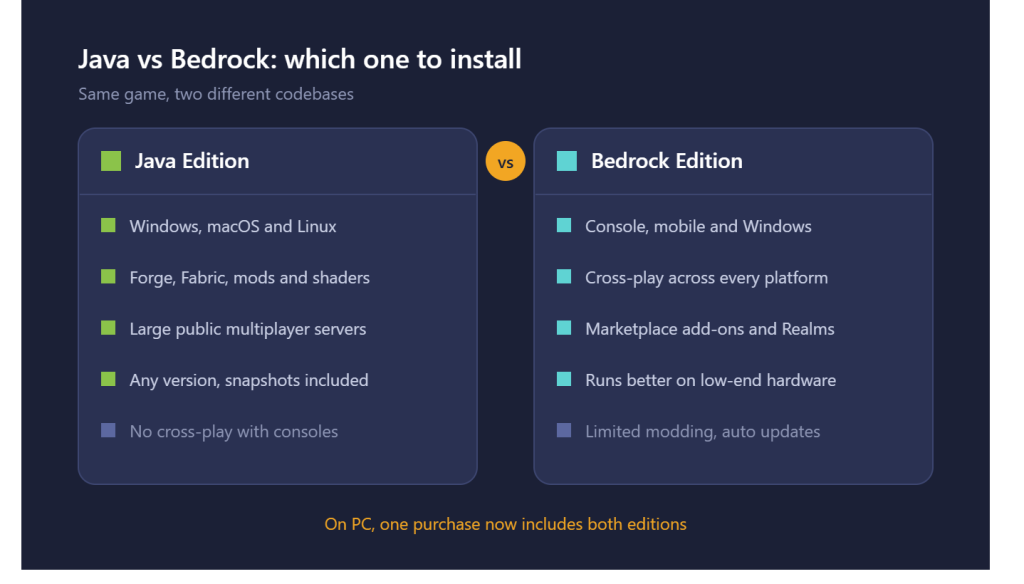
Before you download anything, you need to understand which version of the game you are actually installing, because this single decision affects your mods, your multiplayer options, your performance, and your entire long-term experience with the game. Minecraft Java Edition is the original version, written in Java, and it runs exclusively on Windows, macOS, and Linux desktop computers. It is the edition beloved by the modding community, the version that powers the vast majority of large public multiplayer servers, and the one most technical players prefer because it supports Forge, Fabric, NeoForge, OptiFine, custom shader packs, and an enormous library of community-created content that has been developing for well over a decade. Minecraft Bedrock Edition, by contrast, is written in C++ and is the version that runs on Windows via the Microsoft Store, Xbox consoles, PlayStation, Nintendo Switch, Android phones and tablets, iPhone, iPad, and various VR devices. Bedrock’s headline feature is true cross-platform multiplayer: a player on an Android tablet can join the same world as a friend on an Xbox Series X and another on a Windows gaming desktop. Bedrock also tends to run more smoothly on low-end hardware because it is natively compiled rather than running inside a Java Virtual Machine, and it supports the in-game Marketplace where creators sell skin packs, worlds, and texture packs. The two editions do not share worlds, do not share servers, and historically did not share purchases. The important modern update is that on PC, Mojang now bundles both editions together in a single purchase, meaning that when you buy Minecraft for computer you generally receive access to both Java and Bedrock through the same unified launcher. Because storefront details and regional pricing change over time, always confirm the current bundle on the official website before paying.
3. Minecraft System Requirements: Making Sure Your PC, Gaming Laptop or Mac Can Run It
Minecraft has a reputation for running on almost anything, and while that reputation is partly deserved, it is also the source of enormous frustration for players who install the game on underpowered hardware and then wonder why their frame rate collapses the moment they load a shader pack or a heavily modded world. The published minimum specification for Java Edition is modest: a processor roughly equivalent to an Intel Core i3-3210 or AMD A8-7600 APU, 4 GB of system RAM, integrated graphics on the level of Intel HD Graphics 4000 or AMD Radeon R5, and around 1 GB of free storage for the core game files. The recommended specification steps up meaningfully to something like an Intel Core i5-4690 or AMD A10-7800, 8 GB of RAM, a dedicated graphics card in the class of an NVIDIA GeForce 700 series or AMD Radeon Rx 200 series, and at least 4 GB of storage on a solid-state drive. Those numbers, however, describe vanilla Minecraft at default render distance. The moment you install a large modpack, run a resource pack at 128x or higher resolution, or enable a ray-tracing shader, your real-world requirements change dramatically. Serious modded play in 2026 realistically wants a modern six-core or eight-core CPU with strong single-thread performance, 16 GB of RAM so you can allocate 6 to 8 GB to the Java heap without starving your operating system, an NVMe SSD to cut chunk-loading stutter, and a dedicated GPU with at least 8 GB of video memory if shaders are part of your plan. If you are shopping for a gaming laptop or building a budget gaming PC specifically for Minecraft and similar sandbox titles, prioritize CPU clock speed and fast storage over raw graphics horsepower, because Minecraft’s world generation and chunk processing are far more CPU-bound and I/O-bound than most modern titles.
4. Creating and Securing Your Microsoft Account Before You Buy
Every legitimate copy of Minecraft is now tied to a Microsoft account rather than a legacy Mojang account, and this account is the single most valuable asset in your Minecraft life, because it holds your purchase entitlement, your username, your skin, your Realms subscription, and your access across every device you own. Setting it up properly at the beginning saves an extraordinary amount of pain later. Start by visiting the official Microsoft account signup page and registering with an email address you control permanently and check regularly, ideally not a work or school address that could be revoked. Choose a long, unique password that you do not reuse anywhere else, and store it in a reputable password manager rather than a browser autofill you might lose. Immediately enable two-factor authentication, preferably using an authenticator application that generates time-based one-time codes rather than SMS, since SIM-swap attacks are a well-documented method for hijacking gaming accounts with resale value. Add a recovery email and a recovery phone number so that you can regain access if you are ever locked out. If the account belongs to a child, use Microsoft Family Safety to create a supervised child account linked to a parent account, which lets you set spending limits, control multiplayer and chat permissions, manage screen time, and approve friend requests. Doing this now rather than later matters, because parental controls applied to an existing standalone account require a migration process that is far more tedious than starting correctly. Finally, review the account’s sign-in activity page after setup and confirm there are no unrecognized logins.
5. Buying Minecraft Safely: Official Storefronts, Pricing and Payment Methods
Once your account exists, the purchase itself is straightforward, provided you buy from a legitimate source. The official website, minecraft.net, is the canonical storefront for the PC bundle, and platform-native stores handle the console and mobile versions: the Microsoft Store for Windows and Xbox, the PlayStation Store, the Nintendo eShop, Google Play for Android, and the Apple App Store for iPhone and iPad. Pricing varies by region and currency, and the PC version has historically sat around the thirty-dollar mark in the United States, while mobile versions cost considerably less and console versions sit somewhere in between. Never purchase Minecraft from a third-party key reseller advertising steep discounts, because Minecraft PC keys are not distributed through the gray-market channels those sites rely on, and the overwhelming majority of such listings are either stolen account credentials, chargeback-fraud purchases that will be revoked, or outright scams. When paying, prefer a credit card or a well-established digital wallet that offers purchase protection, and treat any site demanding payment via cryptocurrency, gift card codes, or a direct bank transfer as fraudulent by definition. Before entering payment details, verify that the browser address bar shows a valid certificate and the exact official domain, since typosquatted domains imitating the Minecraft website are a persistent problem. After the transaction completes, sign in to your Microsoft account, open the purchase history, and confirm the entitlement appears there. That confirmation is your proof of ownership and is what the launcher checks every time you sign in on a new device.

6. Downloading the Official Minecraft Launcher on Windows
With the purchase confirmed, downloading the game on Windows is refreshingly simple, and there are two legitimate paths to the same destination. The first is to go to the official Minecraft website, sign in with the Microsoft account you used to buy the game, navigate to the download section, and select the Windows installer, which arrives as a small .msi file typically well under ten megabytes. This file is not the game itself; it is the installer for the Minecraft Launcher, the small management application that authenticates your account, downloads the actual game assets, manages version profiles, and keeps everything patched. The second path is to open the Microsoft Store application built into Windows, search for the Minecraft Launcher, and install it directly from there, which has the practical advantage of automatic background updates handled by the operating system. Either route produces the same launcher. Once the download finishes, locate the file in your Downloads folder and verify that its file size and publisher information look correct; Windows will display the verified publisher in the User Account Control prompt when you run it, and that publisher should be Mojang or Microsoft. If your browser flags the download or your antivirus quarantines it, do not immediately override the warning; instead, re-download from the official domain and confirm you were not redirected by a malicious advertisement, which is a common tactic on search results pages loaded with sponsored links imitating official download buttons.
7. Installing Minecraft on Windows Step by Step
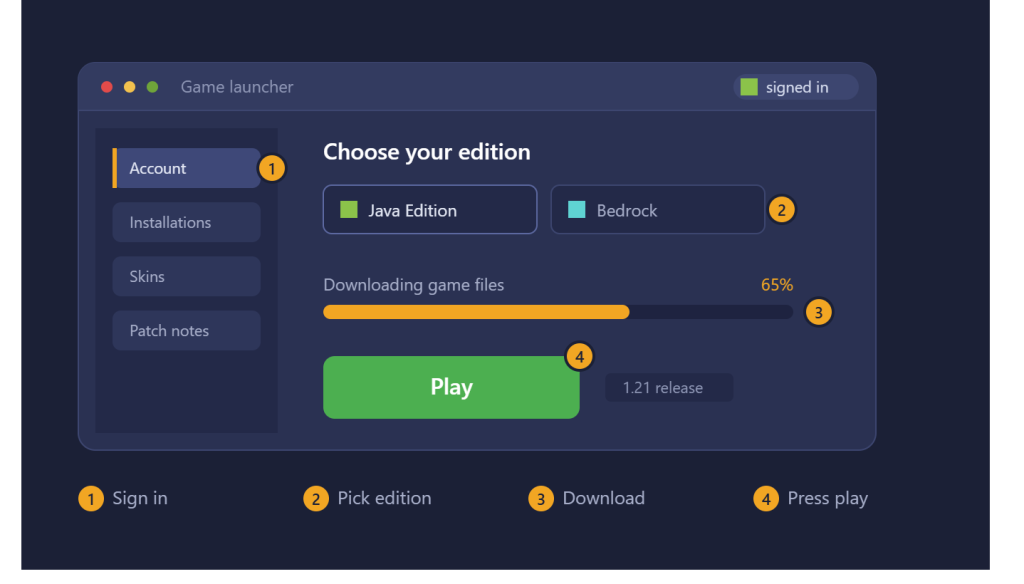
Running the installer begins a short and mercifully uncomplicated process. Double-click the downloaded .msi file, approve the User Account Control prompt that asks for permission to make changes to your device, and the installation wizard will open. You will be offered a default installation directory, usually inside Program Files, and unless you have a specific reason to relocate the application, accepting the default is the safest choice because it keeps permissions consistent and avoids the write-access problems that sometimes occur when the launcher is installed to a secondary drive with restrictive folder permissions. Click through the wizard, wait for the progress bar to complete, and finish. The launcher will then open automatically and prompt you to sign in with your Microsoft account. Sign in, complete any two-factor challenge, and the launcher will verify your entitlement against Microsoft’s servers. At this point you will see the launcher’s main interface with tabs for the editions you own. Selecting an edition and clicking Play triggers the real download: the game client, the asset index, sound files, textures, language files, and, for Java Edition, a bundled Java runtime environment. Depending on your connection speed this takes anywhere from thirty seconds to several minutes, and it requires an active internet connection. Once the download completes the game launches, and from that point forward Java Edition can generally be played offline in single-player provided you have signed in at least once recently on that device.
8. Installing Minecraft on macOS Including Apple Silicon Macs
Mac users follow a broadly similar path with a few platform-specific details worth knowing. From the official download page, select the macOS option, which delivers a .dmg disk image. Double-click it to mount the image, and a Finder window will open showing the Minecraft application icon alongside a shortcut to your Applications folder. Drag the application into Applications, then eject the disk image and delete the .dmg file, since keeping it serves no purpose and only consumes storage. The first time you launch the application, macOS Gatekeeper may warn you that it was downloaded from the internet; because the official build is properly signed and notarized by its developer, you should see a standard confirmation dialog rather than an outright block, and you can simply approve it. If you are running an Apple Silicon Mac with an M-series chip, Java Edition works well, though some older mods and native libraries were originally compiled for Intel architecture and may run through Rosetta 2 translation or require an ARM-native Java distribution to perform optimally. For the smoothest experience with modded play on Apple Silicon, install an ARM64 build of a modern Java Development Kit and point your launcher profile at that runtime rather than relying on a translated Intel runtime. Mac users should also be aware that Bedrock Edition is not officially available for macOS, so cross-play with console and mobile friends is not possible from a Mac without unofficial workarounds that fall outside the terms of service.
9. Installing Minecraft Java Edition on Linux Distributions
Linux support for Java Edition is genuine and officially maintained, though the installation experience varies more than on Windows or macOS because of the diversity of distributions and package managers. The official website offers a .deb package for Debian-based systems including Ubuntu, Linux Mint, and Pop!_OS, which you can install by double-clicking it in your file manager or by running the appropriate package manager command from a terminal. For distributions that do not use .deb packages, such as Fedora, openSUSE, or Arch-based systems, the official site also provides a generic archive containing the launcher, and the community maintains packages in Flathub, the Arch User Repository, and various distribution repositories. Before launching, confirm that a suitable Java runtime is present on your system; while the modern launcher bundles its own runtime for most cases, having a system-level OpenJDK installation available prevents a category of errors related to missing native libraries. You may also need to install graphics driver packages appropriate to your hardware, particularly the proprietary NVIDIA driver or the Mesa stack for AMD and Intel graphics, since Minecraft’s OpenGL rendering path is sensitive to driver quality on Linux. Once the launcher opens and you sign in, everything behaves as it does on other platforms. Linux is genuinely a first-class environment for modded Minecraft, and many server administrators run their game servers on Linux precisely because of its stability, low overhead, and excellent long-running process management.
10. Installing Minecraft Bedrock Edition on Windows Through the Microsoft Store
If your priority is cross-platform play with friends on consoles and phones, Bedrock Edition on Windows is what you want, and it installs through an entirely different mechanism than Java Edition. Because Bedrock on PC is distributed as a Microsoft Store application, the installation is handled by the operating system’s application platform rather than a standalone installer. Open the Microsoft Store, sign in with the same Microsoft account that holds your Minecraft entitlement, search for Minecraft for Windows, and if your account owns it you will see an Install button rather than a price. Click it, and Windows downloads and installs the game in the background, placing it in a protected system directory that is intentionally difficult to modify manually. The modern unified launcher also exposes Bedrock as a selectable edition, which is the more convenient route for most players. Once installed, Bedrock updates automatically through the Store, and you generally have less granular control over which version you are running compared to Java Edition, where the launcher lets you pick any historical release. This matters if you play on a Bedrock server that has not yet updated to the newest protocol version, because an automatic client update can temporarily lock you out until the server catches up. Some players disable automatic Store updates specifically to avoid this, though doing so means manually managing security patches.

11. Downloading and Installing Minecraft on Android and iOS Mobile Devices
The mobile versions of Minecraft are full Bedrock clients, not stripped-down spin-offs, and they support the same cross-play, the same Marketplace, and the same Realms subscriptions as their console and PC counterparts. On Android, open the Google Play Store, search for Minecraft published by Mojang, verify the developer name carefully because clone applications with similar names and icons are a persistent problem, complete the purchase, and tap Install. The download is a few hundred megabytes, and the game will request additional asset downloads on first launch, so connect to Wi-Fi before starting. On iPhone and iPad, the process runs through the App Store with the same verification advice: confirm the publisher, check the review count, and be suspicious of any listing offering the game free. Both platforms tie your purchase to your store account, meaning you can reinstall on any device signed into that same Google or Apple account without paying again. Critically, however, your Minecraft progress, Realms access, and cross-play identity are tied to your Microsoft account, not your store account, so sign in to Microsoft inside the game after installing. Doing so unlocks cross-platform friends lists and lets you resume worlds you started elsewhere. Mobile players on older devices should manage expectations regarding render distance and world size, and should be aware that Minecraft is storage-hungry once you accumulate large worlds and Marketplace content.
12. Getting Minecraft on Xbox, PlayStation and Nintendo Switch Consoles
Console installation is the simplest of all the platforms because the storefront and the operating system handle everything. On Xbox Series X, Series S, and Xbox One, open the Microsoft Store from the dashboard, search for Minecraft, purchase it or install it if it is already included with your Game Pass subscription, and the console downloads and installs it automatically. Xbox Game Pass has historically included Minecraft as part of its library on console and PC, which makes it an unusually cost-effective route if you already subscribe or are considering a subscription for a broader game library. On PlayStation 4 and PlayStation 5, search the PlayStation Store for Minecraft, purchase the appropriate edition, and it downloads to your console; PlayStation cross-play with other platforms is supported, though it must be enabled and requires a Microsoft account sign-in from inside the game. On Nintendo Switch, the Nintendo eShop handles the purchase and installation, and the game runs well in both docked and handheld modes with a reduced render distance appropriate to the hardware. Across all consoles, online multiplayer beyond local play requires the platform’s own subscription service, meaning Xbox Game Pass Core, PlayStation Plus, or Nintendo Switch Online, in addition to any Minecraft Realms subscription you may separately purchase. Budget for that recurring cost when planning multiplayer sessions with family or friends.
13. Launching Minecraft for the First Time and Understanding Installation Profiles
The first launch is where the game finishes assembling itself, and understanding what happens under the hood makes every subsequent problem easier to diagnose. When you click Play in the Java Edition launcher, it downloads the version JAR file, the libraries the game depends on, the asset index describing every sound and texture, and the assets themselves, then spawns a Java process with a specific set of arguments. All of this lands in a directory usually called .minecraft, located inside your user profile: on Windows it lives under AppData Roaming, on macOS inside the Library Application Support folder, and on Linux as a hidden folder in your home directory. Knowing where this directory lives is essential, because it contains your saved worlds in the saves folder, your screenshots, your configuration file with all your keybindings and video settings, your resource packs, your shader packs, your mods folder if you install a mod loader, and your logs, which are the first place to look when something breaks. The launcher’s Installations tab lets you create multiple named profiles, each pinned to a specific game version and optionally pointed at a separate game directory. Experienced players use this aggressively: one profile for the latest vanilla release, another for a specific modpack on an older version, another for a snapshot build to test upcoming features, each with its own isolated directory so mods and configurations never collide.
14. Allocating RAM and Optimizing Java Arguments for Better Performance
Performance tuning is where Java Edition rewards a little technical knowledge, and the single most impactful setting is memory allocation. Java applications run inside a virtual machine with a fixed maximum heap size, and Minecraft’s default allocation of roughly two gigabytes is adequate for vanilla survival but wholly insufficient for a large modpack. To change it, open the launcher, go to Installations, edit the profile you use, expand the advanced settings, and modify the JVM arguments field where you will find a parameter beginning with -Xmx followed by a number and a letter. Setting -Xmx6G allocates six gigabytes, -Xmx8G allocates eight, and so on. The critical discipline here is restraint: never allocate more than roughly half to two-thirds of your total physical memory, because your operating system, your browser, your voice chat application, and the Java process’s own off-heap overhead all need room, and an over-allocated heap causes system-wide swapping that feels far worse than a slightly smaller heap. Counterintuitively, allocating excessive memory can also worsen stutter, because garbage collection pauses grow with heap size. Beyond memory, install performance mods such as Sodium, Lithium, and Phosphor on Fabric, or their equivalents on other loaders, which routinely double or triple frame rates by rewriting Minecraft’s inefficient rendering and lighting code. Update your graphics drivers, cap your frame rate slightly below your monitor’s refresh rate, and reduce render distance before you reduce anything else, since chunk rendering dominates the frame budget.
15. Network Requirements, Latency and Playing Minecraft Online Reliably
Minecraft is bandwidth-light but latency-sensitive, a combination that surprises players who assume a fast internet plan automatically means a good multiplayer experience. A typical Minecraft session consumes only a few hundred kilobits per second per player, meaning almost any modern broadband, fiber, or even a stable mobile hotspot has ample capacity. What actually determines whether the game feels responsive is round-trip latency and packet loss. Blocks that break and then reappear, mobs that teleport, and the infamous rubber-banding while walking are all symptoms of latency spikes or dropped packets rather than insufficient bandwidth. To improve reliability, connect your gaming PC or console to your router with an Ethernet cable rather than Wi-Fi whenever physically possible, since wired connections eliminate interference and dramatically reduce jitter. If wired is impossible, use the 5 GHz band, position the router with line of sight, and consider a mesh Wi-Fi system or a powerline adapter for distant rooms. Enable Quality of Service on your router to prioritize gaming traffic over streaming and downloads. Choose servers geographically close to you, because physics imposes a floor on latency across continents. Some players use a VPN to reach region-locked servers or to mitigate distributed denial-of-service attacks targeting their home connection, but understand that routing through a VPN almost always adds latency unless the provider happens to offer a more efficient path than your ISP.
16. Installing Mods with Forge, Fabric and NeoForge on Java Edition
Modding is the reason a great many players choose Java Edition, and while installing mods sounds intimidating, the modern process is genuinely approachable. Mods require a mod loader, a piece of software that patches the game to support third-party code, and the three dominant loaders are Forge, the long-established option with the deepest library of large content mods; Fabric, a lightweight and fast-updating loader favored for performance mods and smaller quality-of-life additions; and NeoForge, a community-driven fork of Forge that has attracted substantial developer migration. Choose the loader your desired mods require, since a Fabric mod will not run on Forge and vice versa. Download the loader installer from its official website, run it, select Install Client, and point it at your Minecraft directory. The installer creates a new profile in your launcher. Launch that profile once so it generates a mods folder inside your game directory, then close the game, place your downloaded mod JAR files into that folder, and relaunch. Every mod must match both your Minecraft version and your loader, and many require a shared library mod as a dependency. Download mods only from reputable sources such as CurseForge and Modrinth, never from aggregator sites bundling installers, and read the comments before installing anything unfamiliar. For beginners, a curated modpack installed through a launcher such as the CurseForge app, Modrinth, ATLauncher, or Prism handles dependency resolution and version matching automatically, which removes almost all of the difficulty.
17. Installing Resource Packs, Texture Packs and Shaders for Better Visuals
Visual customization is one of the most satisfying things you can do after a clean installation, and it splits into two distinct categories that people often conflate. Resource packs, sometimes still called texture packs, replace the game’s textures, sounds, fonts, and interface elements without altering game logic. Installing one is trivial: download the .zip file, place it in the resourcepacks folder inside your game directory, then open the game, go to Options, select Resource Packs, and move your pack from the available column to the selected column. Higher-resolution packs at 64x, 128x, or 256x look considerably sharper than the default 16x textures but consume substantially more video memory, so match your pack resolution to your graphics card’s capability. Shader packs are a different animal entirely, replacing the game’s rendering pipeline to add realistic lighting, dynamic shadows, volumetric fog, reflective water, and depth of field. Shaders require a shader loader, historically OptiFine and increasingly Iris paired with Sodium for far better performance. Install the loader, drop your shader pack into the shaderpacks folder, and enable it in video settings. Be realistic about the cost: a demanding shader pack can reduce frame rates by seventy percent or more and turns Minecraft into a genuinely GPU-intensive title that will stress a mid-range graphics card at high resolutions.
18. Joining Multiplayer Servers, Realms and Hosting Your Own Minecraft Server
Once the game is installed and running, multiplayer is where most players eventually spend their time, and you have three broad options. The simplest is Minecraft Realms, Mojang’s own subscription hosting service, which gives you a small persistent world for you and a set number of friends, managed entirely from inside the game with no technical configuration whatsoever, billed monthly. The second option is joining an existing public server, which requires only that you open the multiplayer menu, click Add Server, paste in the server’s address, and connect; thousands of communities run survival, creative, minigame, roleplay, and economy servers, most of them free to join. The third and most powerful option is running your own server, either locally on a spare computer or through a dedicated Minecraft server hosting provider. Self-hosting on your own hardware costs nothing beyond electricity and requires downloading the official server JAR from the Minecraft website, accepting the EULA in the generated text file, configuring the server properties file, allocating adequate RAM, and forwarding the correct port on your router, with the caveat that exposing a home connection to the public internet carries security and bandwidth implications. Paid Minecraft server hosting removes that burden by providing a managed control panel, DDoS protection, automatic backups, one-click modpack installation, and hardware sized for the player count you expect, typically billed monthly according to allocated memory. For a modded server with a dozen or more concurrent players, prioritize a host offering high-clock-speed processors and NVMe storage over one advertising the largest raw RAM figure.
19. Troubleshooting the Most Common Minecraft Installation and Launch Errors
Even a clean installation occasionally goes wrong, and nearly every failure falls into a handful of recognizable categories. If the launcher will not install at all, the cause is usually insufficient permissions or an antivirus false positive, resolved by running the installer as administrator and temporarily whitelisting the file. If the launcher opens but sign-in fails, verify your credentials on the Microsoft account website directly, check that your system clock is accurate since certificate validation depends on correct time, and confirm that no corporate firewall or DNS filter is blocking authentication endpoints. If the game downloads but crashes immediately on launch, the most frequent culprits are outdated graphics drivers, a corrupted or mismatched Java runtime, or an incompatible mod, and the crash report saved in the crash-reports folder will name the offending class or mod in nearly every case. Errors mentioning OpenGL or pixel formats point squarely at graphics drivers. Out-of-memory errors point at heap allocation. Errors referencing a missing or invalid session point at authentication. If the game runs but performs terribly, check whether your laptop is using integrated graphics instead of its dedicated GPU, a very common issue resolved in the graphics control panel by forcing the Java executable to use the high-performance adapter. When all else fails, the nuclear option is a clean reinstall: back up your saves folder somewhere safe, delete the game directory entirely, reinstall the launcher, and start fresh, restoring only your worlds.
20. Staying Safe: Avoiding Fake Downloads, Protecting Your Account and Backing Up Your Worlds
The final and most important section concerns security, because the Minecraft player base skews young, spends real money on accounts and cosmetics, and is therefore relentlessly targeted. The overwhelming majority of malware infections attributed to Minecraft come not from the game but from unofficial download sites, free-alt generators, cracked launchers, hacked-client distributions, and mod files hosted outside reputable repositories. Never download the game or any modification from a site you reached through a sponsored search advertisement or a video description link, and treat any promise of free premium access as an outright scam designed to harvest credentials. Keep a reputable antivirus or endpoint security product active, keep your operating system patched, and be particularly suspicious of executable installers offered where a simple JAR or ZIP would suffice. Protect your Microsoft account with two-factor authentication and a unique password stored in a password manager, and never enter your credentials into a third-party site claiming to offer skins, capes, server perks, or account recovery. Finally, back up your worlds. A Minecraft world is a folder, and copying that folder to an external drive or a cloud storage service takes seconds while protecting hundreds of hours of building. Automate it if you can, keep more than one generation of backup, and test a restore once so you know it works. Do those things and your installation will remain stable, secure, and enjoyable for as long as you keep playing.
Frequently Asked Questions
Is Minecraft free to download? The full game requires a purchase, but Mojang offers a free limited trial on several platforms, and a browser-playable classic version exists for nostalgia. Any site offering the complete paid game at no cost is distributing an unauthorized copy.
Do I need Java installed separately to play Minecraft Java Edition? No. The official launcher bundles an appropriate Java runtime automatically. A separate system installation is only useful for advanced modding scenarios or unusual platforms.
Can Java Edition players join Bedrock Edition friends? Not directly. The two editions use incompatible networking, so cross-play between them is not supported. Since the PC bundle includes both, the practical solution is to launch whichever edition your friends are using.
How much storage does Minecraft need? The base game is roughly one to four gigabytes, but large modpacks, high-resolution resource packs, and long-running worlds can easily push a single installation past twenty gigabytes.
Can I transfer my worlds to a new computer? Yes. Copy the saves folder from your old game directory to the same location on the new machine after installing the game there.